1. Short Overview:
Ruan Mei:
Base Stats (Level 80): HP = 1087, DEF = 485, ATK = 660, SPD = 104
Info:
Ruan Mei is a Harmony Path character that is able to provide consistent buffs to all allies, including: DMG Bonus, RES Penetration and Weakness Break Efficiency, as well as 10% Speed. Additionally, she delays the enemies’ next action even further after their weakness is broken and deals a bit of damage when doing so.
These aspects of her kit make her integral to the break archetype as a whole, and a very strong support for traditional DPS comps too.
Character Kit:
Basic ATK: Deals 10 toughness damage.
Skill: Gains ‘Overtone’ for 3 turns and duration counts down at the start of each turn. While Ruan Mei has ‘Overtone’, all allies gain 32% DMG Bonus and 50% Weakness Break Efficiency. A6 Bonus Ability additionally increases Skill’s DMG Bonus buff.
Talent: All teammates excluding Ruan Mei gain 10% SPD buff. When allies Weakness Break, Ruan Mei deals additional Break DMG equal to 120% of her Ice Break DMG.
Ultimate: Ruan Mei deploys a Zone for 2 turns, counting down at the start of each turn. While inside the Zone, all allies’ All-Type RES Penetration increases by 25% and their attacks apply ‘Thanatoplum Rebloom’ to enemies hit (this debuff can not be reapplied until the enemy triggers its effect and recovers from Weakness Break). When enemies afflicted with ‘Thanatoplum Rebloom’ attempt to recover from Weakness Break, their Weakness Break duration is extended, delaying their action by 20% of Ruan Mei’s Break Effect + 10% and deals 50% of Ruan Mei’s Ice Break DMG.
Technique: In the Over-world, when entering battle after using Technique, triggers the skill without consuming skill points. In any Simulated/Divergent Universe, depletes up to 2000% (100% for every blessing possesed) more toughness when entering battle and deals additional 100% Break DMG.
Ascension-locked Bonus Abilities: A2: Increases all allies’ Break Effect by 20% when in battle. A4: Ruan Mei regenerates 5 energy at the start of her turn. A6: For every 10% Break Effect above 120% in-battle, up to 180%, the Skill increases ally damage by 6%, for up to an additional 36% DMG Bonus.
Stat Bonus Traces: 37.3% Break Effect, 22.5% DEF, 5 SPD
Slow or Fast?
Building Ruan Mei slow has the benefit of having her ultimate be permanently active, as compared to a fast build where you have a bit of down-time.
This “Permanent Up-time” for her Ultimate is only for 0 cycle clears however, and even for 0 cycle clears it can become non-permanent due to things like Robin’s Ultimate or enemies advancing allies forward.
Both builds have their flaws. The difference between the two is that the slow build is catered more towards 0 cycle clears, while the other one is not and has a wider application range. You should decide for yourself which of the two to use, based on how fast you aim to clear.
2. How to Play:
Ruan Mei is a support that provides buffs. Her buffs have the ability to maintain a sort of 'permanent' up-time, which is what this entire How to Play section will be talking about.
Buff Up-time
Her skill provides a buff to herself, which increases all allies’ DMG and Weakness Break Efficiency. It lasts for 3 turns (and counts down at the start of her turn) and so, what you will want to do is just use it whenever it expires, effectively initiating a Skill-Basic ATK-Basic ATK ability rotation. Her Ultimate also provides a substantial buff to all allies. It however only lasts for 2 turns, making permanent up-time a bit more difficult to achieve. Check below for more details.
Energy Requirement
Half of Ruan Mei’s gameplay lies in keeping her Ultimate’s buff active. Her ultimate lasts for 2 of her own turns, which will mean that by the end of her 3rd turn, she needs to have generated enough energy to use her Ultimate again, in order to maintain ‘permanent’ up-time.
How do I make her get enough energy for that?
In order for Ruan Mei to be able to do that, she usually needs to use a Energy Regeneration Rate% main stat Link Rope and either a Meshing Cogs light cone or Memories of the Past light cone, as these light cones generate additional energy when the wearer initiates an attack. Despite using these energy regeneration/generation sources, Ruan Mei still has to either use a ERR-providing planar ornament set or to get hit 1 time to maintain the ‘permanent’ up-time. However, getting hit over the course of a 3 turn ability rotation is rather common.
Other forms of energy generation can also substitute for the energy given by either of the two previously mentioned light cones, for example: 1 proc of the Quid Pro Quo light cone, 1 usage of Huohuo’s Ultimate ability, or for Ruan Mei to simply get hit 4 to 2 times over her ability rotation.
Most enemy attacks generate energy for the allies that get hit by them.
3. RGM Relevancy:
Memory of Chaos, Pure Fiction and Apocalyptic Shadow
RGM Notes:
We preach this quite often, all Harmony characters’ relevancy in end-game content is highly dependent on the relevant teams and archetypes that they are capable of supporting. However, Harmony units typically always maintain some form of relevancy, despite what the meta may dictate.
That being said, RM in the current meta primarily functions to support Break, and sometimes team compositions with multiple units dealing damage. With the advent of Fugue, and the number of alternative non-break teams that RM fits into, she is an incredibly high value pull, holding a valuable place in the majority of accounts.
4. Team Compositions & Synergies:
Ruan Mei is an incredibly versatile support, but thrives in two specific scenarios. Either when your team falls under that of the break archetype, or when you have a team with multiple members of the team doing damage and/or the majority of the party is able to reap the benefits of the team-wide nature of her buffs.
Where to use RM?
Examples of Synergy:
Boothill, Firefly and Rappa all almost rely on RM because of her Weakness Break Efficiency buff that enables these units to quicker break enemies’ toughness bars and deal even more damage after doing so, due to the fact that Super Break DMG scales with Toughness DMG.
Warning
Please note that RM’s compositions are flexible, and NOT restricted to any of the following teams or any of the suggested synergies. She is an extremely versatile support, but shiness in specific areas where the whole team (or close to it) can benefit from her buffs.
Team Compositions:
Ruan Mei fits into many team compositions, as her buffs are consistent and rather universal. Below are a few examples of teams she fits especially well into. For more details on how to play the teams, please check out the Damage Dealer’s guide.
Black Swan | Kafka | Ruan Mei | Huohuo  |
|---|
Break DPS   | Ruan Mei | HMC/Fugue  | Fugue/Sustain  |
|---|
Imbibitor Lunae | Ruan Mei | Sparkle  | Sustain |
|---|
5. Trace Levelling Priority
Ultimate > Skill >Talent
Please note that all traces are beneficial to this unit and we recommenced that all be brought to max level and for every ascension-locked bonus ability to be unlocked.
- Prioritize SPD stat bonus traces, and then Break Effect ones. Ensure all are eventually unlocked.
Ignore the Basic Attack. There is no point in levelling it.
6. Light Cone Rankings
1. Past Self in Mirror
Light Cone Effect
Increases the wearer’s Break Effect by 60/70/80/90/100%. After the wearer uses their Ultimate, increases all allies’ DMG by 24/28/32/36/40%, lasting for 3 turns. Should the wearer’s Break Effect exceed or equal 150%, 1 Skill Point will be recovered. At the start of each wave, immediately regenerates 10/12.5/15/17.5/20 Energy for all allies. Effects of the same type cannot stack.
It provides the biggest amount of break effect out of any light cone, making Ruan Mei significantly easier to build for non-Super Break teams (to satisfy the 160% Break Effect stat requirement). Along with this, it enables a number of shorter all ultimate rotations by giving energy to the entire team, as well as 1 Skill Point for every Ultimate usage that has the ability to allow for better ally ability rotations and SP economy.
Does not usually allow for permanent Ultimate buff up-time, requiring Ruan Mei to be hit multiple times for energy.
2. Memories of The Past

Light Cone Effect
Increases the wearer’s Break Effect by 28/35/42/49/56%. When the wearer attacks, additionally regenerates 4/5/6/7/8 Energy. This effect can only be triggered 1 time per turn.
This light cone increases the wearer’s break effect the second most out of any Harmony path light cone and allows for ‘permanent’ ultimate up-time.
It requires a minimum Superimposition 5 to allow Ruan Mei 'permanent' ultimate up-time.
3. Meshing Cogs
Light Cone Effect
After the wearer uses attacks or gets hit, additionally regenerates 4/5/6/7/8 Energy. This effect can only be triggered 1 time per turn.
Allows Ruan Mei ‘permanent’ ultimate up-time, thanks to its energy generation.
It provides abysmally low base stats due to its 3★ rarity, making the wearer prone to one-shot attacks.
7. Relic and Planar Ornament Sets
Relic Sets
There is no one definitive best choice, RM's best relics choices are
dependent on the scenario.
Watchmaker, Master Dream of Machinations
Relic 4-Pc Set Effect
When the wearer uses their Ultimate on an ally, Break Effect for all allies increases by 30% for 2 turn(s). This effect cannot be stacked.
This set is Ruan Mei’s best supporting set for Super Break DMG teams, and is ideal when it is not in use by Harmony MC. However, it doesn’t contribute much of value to non-Super Break DMG team compositions as Break Effect is useless in most other team compositions.
Iron Cavalry Against the Scourge
Relic 4-Pc Set Effect
If the wearer’s Break Effect is 150% or higher, ignores 10% of the enemy target’s DEF when dealing Break DMG to them. When the wearer’s Break Effect is 250% or higher, the Super Break DMG they deal to enemy targets additionally ignores 15% of the targets’ DEF.
This set is Ruan Mei’s best set if the player is looking to optimize her personal damage (usually a Slow Ruan Mei build). Can be used in non-Super Break DMG teams as well and is the best alternative in the case
2-Piece x 2-Piece Break Effect/Speed Combinations
E.g. Combining 2-Pc Cavalry (16% Break Effect) with 2-Pc Sacerdos’ (6% Speed).*
These, as stated by the game: only provide stat bonuses. Which is helpful in hitting a desired breakpoint in speed or break effect. These combinations are good enough to use, but you can also just use any other set as long as your desired stats are achieved.
Planar Ornament Sets
Lushaka, the Sunken Seas
Planar Oranement 2-Pc Set Effect
Increases the wearer’s Energy Regeneration Rate by 5%. If the wearer is not the first character in the team lineup, then increase the ATK of the first character in the team lineup by 12%.
This is generally Ruan Mei’s best supporting planar ornament set. Suitable for hypercarry teams and can even work with Firefly to further increase her Break Effect stat slightly. Does not work with Rappa, as her ATK → Break Effect conversion is capped.
Teams with damage dealer/s that don’t desire/can’t use ATK buffs or don’t want to be slotted in the first slot of the team may desire the usage of one of the other sets listed below (besides Fleet of the Ageless, as that provides ATK as well).
Forge of The Kalpagni Lantern
Planar Oranement 2-Pc Set Effect
Increase the wearer’s SPD by 6%. When the wearer hits enemy targets with Fire Weakness, the wearer’s Break Effect increases by 40%, lasting for 1 turn(s).
This set is beneficial for Ruan Mei’s personal damage and helps reach break points for a Fast Ruan Mei build. Do note that if you are not using Firefly in the same team and are against non-fire weak enemies, you will not be able to take full advantage of this set.
Sprightly Vonwacq
Planar Oranement 2-Pc Set Effect
Increases the wearer’s Energy Regeneration Rate by 5%. When the wearer’s SPD reaches 120 or higher, the wearer’s action is Advanced Forward by 40% immediately upon entering battle.
Helps Ruan Mei to achieve a 3 turn ultimate on Fast Ruan Mei build and may allow for extra actions (potentially gaining the team a skill point). It is somewhat needed for a Slow Ruan Mei build, as it is the only way to have your ultimate up before the rest of your team takes action.
Take note!
Slow Ruan Mei builds can also use energy sources to achieve a 3 turn Ultimate rotation and use this set to achieve that, but we don’t recommend it as it sort of defeats the purpose of a Slow Ruan Mei build.
8. Relic Main and Subsidiary Stats
Main Stats
Boots: Slow Ruan Mei: HP% / DEF% Fast Ruan Mei: SPD
Body: HP% / DEF%
Sphere: HP% / DEF%
Link Rope: Slow Ruan Mei: Break Effect% Rope Fast Ruan Mei: Energy Regeneration Rate%
Subsidiary Stats Priority
For FAST Ruan Mei:
In super break teams:
- SPD until you hit at least the 133.334 speed break point.
- SPD until you hit a higher speed break point.
- Break Effect. The 160% Break Effect stat requirement does not matter, just hit as high of a break effect as you can for some extra damage and action delay.
- HP% & DEF%, with DEF% being generally slightly better of a sustain stat.
In normal teams:
- SPD until you hit at least the 133.334 speed break point.
- Break Effect until you hit the 160% Break Effect stat requirement for Ruan Mei’s Ascension 6 Bonus Ability.
- SPD until you hit a higher speed break point.
- Break Effect
- HP% & DEF%, with DEF% being generally slightly better of a sustain stat.
For SLOW Ruan Mei:
- SPD until you hit 120 SPD.
Warning.
Only try to hit 120 if you’re using Sprightly Vonwacq. Never go above 133.333 SPD, as it defeats the purpose of a SLOW Ruan Mei.
- Break Effect. As much of it as possible.
- HP% & DEF%, with DEF% being generally slightly better of a sustain stat.
9. Stat Goals:
Fast Ruan Mei:
- 160+ Break Effect
- 160 SPD, or any of the primary speed break points like 133.334 or 200. If you wish to investigate more specific breakpoints, consult the relevant breakpoints. Do also note that Ruan Mei’s 10% SPD buff does not apply to herself.
Slow Ruan Mei:
- 250+ Break Effect
Applicable to both:
If you’re using 2 HP Main Stats:
- If using a 4★ Light Cone, aim for around 4200+ HP and ~1100-1200 DEF.
- If using a 5★ Light Cone, aim for around 5000+ HP and 1300+ DEF.
If you’re using 2 DEF Main Stats:
- For 4★ Light Cones, aim for around 3300+ HP and 1600+ DEF.
- For 5★ Light Cones, aim for around 3400+ HP and 1900+ DEF.
If you’re using 1 DEF Main and 1 HP Main:
- For 4★ Light Cones, aim for around 3700+ HP and 1400+ DEF.
- For 5★ Light Cones, aim for around 4000+ HP and 1600+ DEF.
10. Eidolon Break-down
Eidolon 1
Neuronic Embroidery
While the Ultimate’s field is deployed, the DMG dealt by all allies ignores 20% of the target’s DEF.
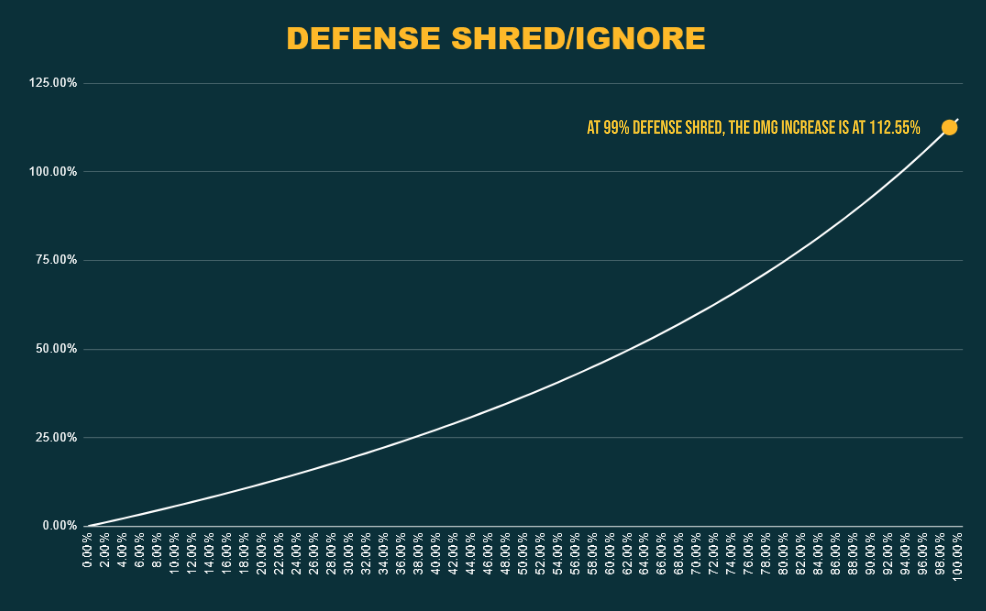
This is Ruan Mei’s most notable Eidolon, providing a noticeable damage increase to the team on it’s own. It is notable that, due to the exponential nature of DEF Shred/Ignore sources, Ruan Mei’s 1st Eidolon will be better the more DEF Shred and/or Ignore the team already has stacked.
Overall, this Eidolon is worth the cost.
The graph below demonstrates DEF Shred &/ Ignore proportional to DMG Increase.
Y Axis = DMG Increase
X Axis = DEF Shred &/ Ignore
Eidolon 2
Reedside Promenade
With Ruan Mei on the field, all allies increase their ATK by 40% when dealing DMG to enemies with Weakness Break.
This Eidolon provides a decent amount of damage amplification when the condition is met. The condition however, cannot be consistently met in normal teams and whilst it can easily be met in Super Break DMG teams, the buff is meaningless.
This eidolon lacks much usage and is rarely, if ever, worth the cost.
Eidolon 4
Chatoyant Éclat
When an enemy target’s Weakness is Broken, Ruan Mei’s Break Effect increases by 100% for 3 turn(s).
This eidolons provides a good increase in Ruan Mei’s personal damage and Action Delay% but does not much more than that. However, with Ruan Mei’s Eidolon 6, this eidolon becomes quite a good one, with Ruan Mei becoming a sort of damage dealer by herself.
Overall, not worth the cost by itself.
Eidolon 6
Sash Cascade
Extends the duration of the Ultimate’s field by 1 turn(s). The Talent’s Break DMG multiplier additionally increases by 200%.
Ruan Mei’s personal damage with this eidolon, combined with previous eidolons, reaches the hundreds of thousands. You can expect around 150K DMG per talent proc in a normal team and around 250K DMG per talent proc in a Super Break DMG team; or a max of around 400K if you use a Silver Wolf or Pela instead of a Super Break DMG DPS in a Super Break DMG team with Fugue and HMC.
Overall, this eidolon is worth the cost if you decide to pursue this much investment in Ruan Mei.**
In general, E6 Supports are worth the cost if you decide to pull for them this many times.